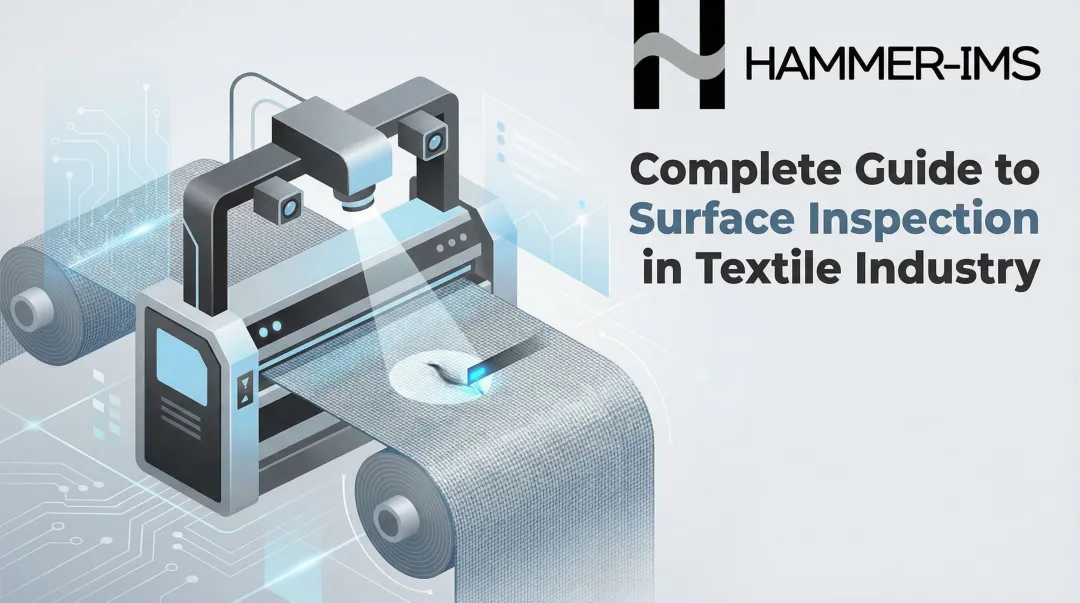
Introduction
Insulation boards—EPS, XPS, PIR, PUR, and mineral wool—are critical to construction and industrial thermal performance. Surface quality determines whether these products meet compressive strength specifications, deliver declared R-values, and satisfy regulatory requirements.
Yet many production facilities still rely on visual spot checks, missing defects that only surface as rejected batches or customer complaints.
Surface inspection during production is a process-critical requirement. Undetected thickness drift, skin cracks, or facing delamination translates directly to field failures, rework, and damaged customer relationships.
This article covers the key surface properties to inspect, the primary inspection methods, and how to interpret results so out-of-spec boards never leave the line.
Key Takeaways
- Effective surface inspections cover thickness uniformity, surface integrity, facing adhesion, and density consistency
- Three inspection methods exist: visual (fast but incomplete), contact measurement (spot checks), and contactless inline systems (full coverage)
- Out-of-spec thickness and facing delamination are the most consequential defects — both demand immediate line review
- Automated inline measurement delivers accurate real-time quality data, reducing reliance on manual sampling
Key Surface Properties to Inspect on Insulation Boards
Effective insulation board surface inspections start with knowing which properties matter. Four characteristics link directly to end-use performance and customer specifications:
- Thickness uniformity across the board face
- Dimensional tolerance (length and width)
- Surface smoothness
- Colour consistency
A board that deviates by 2 mm in thickness can fail thermal performance requirements. A facing that lifts at the edges compromises vapour barrier function.
Surface Integrity Indicators
Defects to watch for include:
- Cracks or fractures – compromise compressive strength and can propagate under load
- Surface depressions or bubbles – indicate gas escape issues during foaming or pressing
- Exposed closed-cell structure – shows surface skin damage on foam boards (EPS, XPS, PIR)
- Voids – boards should have no more than 8 voids larger than 3.2 mm per 0.74 m² of surface area, per Dryvit EPS specifications
- Projections or wire marks – surfaces must be free of projections exceeding 1.6 mm
Facing adhesion is a separate concern. On boarded insulation with foil, glass mat, or paper facings, inspect for delamination, wrinkles, lifted edges, or gaps at joints. Foil-faced polyiso acts as a vapour retarder; if the facing is compromised, the core absorbs moisture and R-value drops.
Density and Dimensional Accuracy
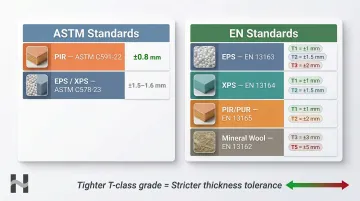
Thickness non-uniformity is the most common and impactful defect in insulation board production. Meeting published tolerance standards is the minimum bar — the question is how quickly deviations are caught. Standards vary by material and region:
ASTM Standards:
- PIR boards (ASTM C591-22): ±0.8 mm thickness tolerance
- EPS/XPS boards (ASTM C578-23): ±1.5 mm for boards under 25 mm thick; ±1.6 mm for thicker boards (verify against current standard edition)
EN Standards:
- EPS (EN 13163): T1 class ±2 mm, T2 class ±1 mm
- XPS (EN 13164): T1 class ±2 mm for boards under 50 mm; T2 class ±1.5 mm (planed only)
- PIR/PUR (EN 13165): T1 class ±3 mm for boards under 50 mm; T3 class ±1.5 mm
- Mineral wool (EN 13162): T1 class -5% or -5 mm; T5 class -1% or -1 mm to +3 mm
Over-thickness wastes raw material; under-density boards fail compressive tests and deliver lower R-values than specified. Catching either deviation in-line — rather than at end-of-line sampling — is where measurement systems make a measurable difference to yield.
Inspection Methods for Insulation Board Surfaces
The three inspection methods—visual, contact-based, and contactless inline—are not mutually exclusive. Most quality programmes combine them to cover different defect types and production speeds. The following breakdown covers how each method works, what it requires, and where it falls short.
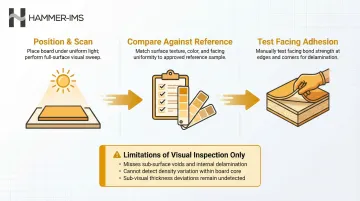
Visual Inspection
Description: Used to identify observable surface defects including colour inconsistency, surface skin damage, bubbles, cracks, and facing alignment issues.
Tools Needed:
- Adequate directional or overhead lighting
- Trained inspector
- Reference colour/surface standard sample
Step-by-Step:
- Position and scan systematically – Place the board flat on an inspection table under consistent lighting; inspect both faces and all four edges from one end to the other
- Compare against reference – Check surface texture and colour uniformity against an approved sample; mark any deviations, discolourations, or irregularities
- Test facing adhesion – Check facing adhesion at edges and corners by attempting gentle separation; note any lifting, bubbling, or gaps
In Practice:
Fast and low-cost, visual inspection reliably catches obvious surface damage. It misses sub-surface voids, internal density variations, and thickness deviations below the visual threshold—making it insufficient as a standalone method.
Contact Measurement (Manual Dimensional Inspection)
Description: Measures board thickness, flatness, and dimensional accuracy using physical gauges; detects deviations that visual inspection cannot confirm.
Tools Needed:
- Digital callipers or thickness gauge
- Straightedge or precision flat reference surface
- Tape measure for length and width
- Measurement grid template
Step-by-Step:
- Check flatness – Place the board on a flat reference surface; use a straightedge across the face to identify bowing or warping (gap between straightedge and board indicates deviation)
- Measure thickness at grid points – Measure thickness at a minimum of five points (four corners + centre) using digital callipers; record values and calculate deviation from nominal
- Verify length and width – Record measurements and compare against product specification tolerances
EN 823:2013 specifies reference measurement methods: boards ≤600 mm require 2 thickness measurements; boards >600 mm to ≤1500 mm require 4 measurements; boards >1500 mm require 4 + 1 additional measurement per extra 500 mm.
Trade-offs:
Delivers accurate spot measurements at defined points. Key limitations:
- Samples only discrete locations—defects between measurement points can go undetected
- Too slow for continuous inline 100% inspection
- Soft foams can deform under mechanical callipers, producing false readings
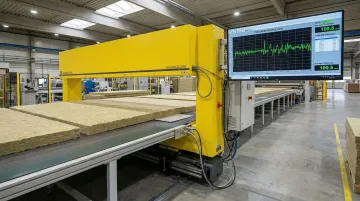
Contactless Inline Measurement
Description: Uses non-contact sensor technology (millimetre-wave or laser-based systems) to scan the full board surface continuously during production, capturing thickness profile and surface variation in real time.
Tools Needed:
- Inline sensor frame or scanning gauge installed across the production line width
- Connected data acquisition system with visualisation software
Step-by-Step:
- Install and calibrate – Install the measurement frame across the conveyor at the appropriate stage (post-cutting or post-pressing); calibrate sensors to the board material and target thickness
- Run at production speed – The system scans each board continuously, generating a full thickness and surface profile map
- Review and adjust in real time – Monitor the output on the interface; production parameters can be adjusted immediately based on live deviation data (closed-loop control)
Advantages and Investment:
Provides 100% inspection coverage and real-time feedback without slowing the line or contacting the product. The data feeds directly into process adjustments, enabling closed-loop control that manual methods cannot replicate.
Upfront investment is higher than contact-based methods. In practice, payback comes through elimination of batch-level failures and reduced material waste—at Abriso-Jiffy's XPS insulation board production, inline M-Ray measurement achieved payback within 18 months through scrap reduction alone.
How to Interpret Surface Inspection Results
Misreading a surface inspection result—dismissing a real defect or flagging an acceptable board—leads to waste, rework, or defective product reaching customers. The stakes rise sharply when out-of-spec boards reach thermal or fire-rated assemblies.
Normal / Acceptable
A conforming board shows consistent surface skin, no cracks or depressions beyond defined thresholds, and thickness within tolerance (e.g., ±1 mm or ±2% of nominal). Release to the next production stage or packaging.
Minor Issues (In-Tolerance Deviations)
Slight surface roughness, minor colour variation, or thickness at the outer edge of the tolerance band all fall within acceptable range — provided they stay within specification. Document and flag for trend monitoring; do not reject unless the pattern repeats across multiple boards.
Out-of-Spec Conditions
Thickness deviation beyond tolerance, visible facing delamination, surface cracks exceeding defined limits, or large voids pointing to internal foam structure breakdown all require immediate action:
- Quarantine affected boards before they advance further in the line
- Review production parameters — extrusion temperature, die settings, and conveyor speed
- Identify and resolve the root cause before resuming standard production
Common Errors in Insulation Board Surface Inspections
Inspection errors are as damaging as the defects themselves—a missed defect ships, a false reject wastes material.
Measuring at Non-Representative Points
Taking thickness measurements only at board edges — where compression from cutting can artificially alter dimensions — rather than at a standardised multi-point grid gives a misleading picture of the board's actual thickness profile. Always measure at corners, midpoints, and centre to capture the full dimensional range.
Relying on Visual Inspection Alone for Dimensional Compliance
Surface appearance can look acceptable while thickness is out of tolerance. The smooth skin of extruded foam boards can conceal dimensional variation that only measurement data will catch. Always corroborate visual inspection with direct measurement.
Ignoring Board Temperature and Conditioning State
Foam boards measured immediately off the extrusion line may not have reached ambient temperature equilibrium; thermal expansion produces false readings. EUMEPS guidelines mandate measurement after at least 72 hours of ageing post-manufacture.
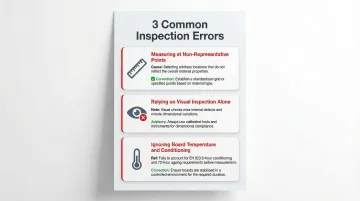
EN 823 sets a separate requirement: test specimens must be stored for at least 6 hours at (23 ± 5) °C before measurement. Both standards exist for the same reason — stable dimensions require stable temperature.
Safety and Best Practices During Insulation Board Inspections
PPE Requirements
- Wear respiratory protection when cutting or handling fibrous mineral wool boards — airborne fibre risk is significant in unventilated areas
- Protect skin and eyes when working with glass-fibre-faced boards
- Use gloves when handling large foam board formats to prevent edge abrasions
Regulatory guidance reinforces these precautions. EURIMA advises covering exposed skin, wearing FFP2 face masks in unventilated areas, and using goggles when working overhead. OSHA sets exposure limits for mineral wool at 15 mg/m³ total dust and 5 mg/m³ respirable fraction (8-hour TWA).
Practical Accuracy Best Practices
- Calibrate all contact measurement instruments at the start of each production shift using a certified reference standard
- For contactless systems, verify sensor calibration with a traceable reference board after any production changeover or material specification change
- Keep tables and conveyor sections free of debris — contamination can artificially raise or indent boards during measurement, skewing results
ISO/IEC 17025:2017 requires all measurement results to be metrologically traceable to the SI system through an unbroken, documented calibration chain — making these daily checks a compliance obligation, not just a best practice.
Conclusion
Reliable insulation board surface inspection combines visual checks, contact dimensional measurement, and—for high-volume production—continuous inline contactless scanning to catch defects at every level, from obvious surface damage to sub-millimetre thickness drift.
A well-defined pass/fail criterion combined with real-time production feedback makes inspection an active process control tool, not just a final quality check. That shift in function is where the measurable value lies.
Inline systems operating at kilohertz sampling rates generate millions of data points per shift, feeding closed-loop process control directly. If density trends low, the system signals adjustments to bead expansion parameters. If thickness drifts, it corrects cutting or pressing station settings before out-of-spec boards accumulate.
Key outcomes from a well-integrated inspection approach:
- Catches sub-millimetre thickness drift before downstream scrap builds up
- Converts raw measurement data into actionable process adjustments
- Reduces dependence on end-of-line sampling by monitoring every board
- Supports closed-loop control across cutting, pressing, and expansion stages
Frequently Asked Questions
What are the 4 types of inspections for insulation?
Insulation inspections broadly fall into four types: visual/external inspection, internal/penetrating inspection (destructive or imaging-based), dimensional/measurement-based inspection, and risk-based assessment. In manufacturing contexts, dimensional and visual inspection are the primary surface inspection types used for production quality control.
What does an insulation inspector look for?
An insulation inspector looks for surface defects (cracks, voids, delamination), dimensional accuracy (thickness and flatness within tolerance), facing adhesion quality, and density consistency. Together, these determine whether a board meets thermal performance targets and compressive strength requirements before it leaves the line.
How often should insulation be inspected?
In production, insulation boards should be inspected continuously (via inline systems) or per-shift using sampling protocols defined by the quality programme. For installed insulation, annual inspection is standard — though high-temperature or high-humidity environments often call for more frequent checks.
What surface defects are most commonly found in insulation boards during production?
The most frequent defects are thickness non-uniformity, surface skin cracks, facing delamination on faced boards, and bubble or void formation. All are typically linked to process parameter deviations such as extrusion temperature, die settings, or conveyor speed issues.
Can insulation board surface inspections be automated on the production line?
Yes. Contactless inline measurement systems using millimetre-wave or laser technologies can perform 100% surface and thickness scanning at production speed, enabling real-time quality control and closed-loop adjustment. Unlike manual spot checks, they flag deviations the moment they appear — before off-spec material accumulates.