Introduction
Poor acoustics dramatically affect both safety and performance. Research shows that low signal-to-noise ratios in vehicle cabins reduce speech intelligibility and increase listening effort, while dual-task costs in challenging acoustic conditions result in poorer driving performance, particularly among older adults.
These acoustic challenges extend beyond vehicles. Whether you're installing a subwoofer in your car or mixing tracks in a bedroom studio, the core problems are the same: muddy bass, listener fatigue, and distorted sound perception from untreated reflective surfaces.
Both environments share similar resonant frequencies, yet each requires a different approach to fix them.
This guide covers practical treatment strategies for both settings — targeting the changes that produce the biggest sonic improvement without full coverage or heavy investment.
Key Takeaways
- Acoustic treatment controls reflections and resonance — not the same as soundproofing, which blocks sound from entering or leaving
- In vehicles, prioritise door panels, floor, and trunk before upgrading audio components
- In studios, corner bass traps and first-reflection points deliver the highest return on investment
- Strategic placement of dense materials outperforms full-surface foam coverage
- Measure before you treat: even basic analysis reveals which frequencies need attention
What Is Acoustic Treatment and Why Does It Matter in Both Environments
Acoustic treatment and soundproofing solve entirely different problems. Soundproofing prevents sound from passing through walls using mass and decoupling, while acoustic treatment covers surfaces with absorptive materials to limit reflections and improve sound quality within a space.
Two mechanisms drive effective acoustic treatment:
- Sound Absorption: Porous materials like mineral wool convert sound energy into heat through friction, reducing reflections and controlling reverberation time.
- Sound Diffusion: Diffusers scatter reflections evenly across their effective planes, reducing flutter echo and comb filtering without removing acoustic energy from the room.
Both vehicles and studios face the same core problem: parallel hard surfaces create flutter echoes and standing waves that muddy sound. Yet they differ dramatically in scale, constraints, and treatment priorities.
Cars require vibration damping and barrier materials to address structural resonance and road noise. Studios need absorption and diffusion to control room modes and reflection patterns. Understanding this distinction determines whether your treatment investment succeeds or fails.
Acoustic Treatment Tips for Vehicles
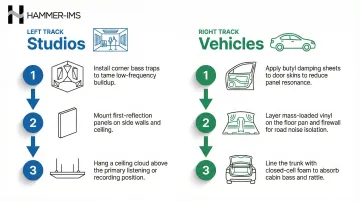
Start with the Doors
Door panels are primary contributors to interior radiated sound pressure. They house speakers, flex under bass frequencies, and leak air through gaps—all of which blur mid-bass clarity and create panel resonance.
Apply butyl rubber-based deadening mats to the inner door skin. Dynamat Xtreme (1.7mm thick) increases the acoustic loss factor of untreated steel from roughly 0.001 to 0.417 at 200 Hz — a 400-fold improvement. This eliminates panel flex and lets speakers perform closer to their rated output.
Address the Floor and Firewall
Road and engine noise transmission through the floor pan is the most common complaint among car audio enthusiasts. Heavy mass-loaded vinyl (MLV) or dense butyl mats reduce this airborne noise substantially.
MLV requires 100% sealed coverage to function effectively. Small gaps or improper sealing degrade performance noticeably. Use 2mm thickness on the floor pan for adequate noise reduction, and add a closed-cell foam decoupling layer beneath the MLV for optimal results.
Material thickness and surface coverage percentage directly affect noise reduction effectiveness — spot application delivers minimal benefit compared to full-area treatment.
Treat the Trunk or Cargo Area
Unlined metal surfaces in the trunk cause severe low-frequency resonance that muddies bass output. The trunk cavity couples acoustically with the cabin through apertures like rear seats, behaving as a Helmholtz resonator that alters acoustic modes.
Apply closed-cell foam or fibreglass lining to:
- Trunk walls and floor
- Underside of the rear deck
- Spare tire well (often ignored but acts as a resonant cavity)
This treatment tightens low-frequency response and prevents bass notes from blurring together.

The Role of Material Consistency
Automotive acoustic materials must deliver predictable performance across production runs. Manufacturers producing these materials (butyl rubber mats and MLV sheets) rely on precision thickness measurement systems to ensure uniform acoustic properties.
Companies like Hammer-IMS provide non-contact measurement technology for rubber and mineral wool production lines, where consistent material thickness is critical to reliable sound deadening results. Variations in thickness alter acoustic performance, making quality control essential during manufacturing.
Common Vehicle-Specific Oversights
Don't ignore these high-impact areas:
- Grommets and wiring pass-throughs: Seal gaps with butyl rope or acoustic caulk to prevent air leakage
- Headliner and pillars: Treat with thin closed-cell foam to reduce mid-to-high frequency flutter
- Boot seal and door jambs: Check rubber weatherstripping for gaps that allow wind noise and airborne sound intrusion
Acoustic Treatment Tips for Home Studios
Start with Bass Traps in Corners
Room modes cause uneven low-frequency decay and pressure buildup, particularly in trihedral corners where walls meet ceiling or floor. Sound pressure variation for all frequencies is maximum in these corners.
Install floor-to-ceiling bass trap panels in all four vertical corners before any other treatment. Use dense mineral wool (minimum 4 inches thick at 60 kg/m³ density) to address the most problematic room resonances. In small rectangular rooms, no other single intervention resolves as many acoustic issues at once.
Identify and Treat First-Reflection Points
Use the mirror technique to locate first-reflection points: sit at your listening position while a helper moves a mirror along side walls, ceiling, and rear wall. Where you see the speaker reflected is where direct sound bounces toward your ears.
Place 2–4 inch thick acoustic panels at these specific points. This reduces comb filtering (where direct and reflected sound interfere destructively) and improves stereo imaging without requiring full-wall coverage.
First-reflection treatment delivers measurable clarity improvements for minimal material investment—prioritise side walls and ceiling before treating rear surfaces.
Balance Absorption with Diffusion
Over-treated rooms become acoustically "dead," creating an unnatural and fatiguing work environment. Use absorption on the front half of the room (behind and beside monitors) and diffusion panels on the rear wall.
QRD (Quadratic Residue Diffusers) consist of wells based on mathematical sequences that scatter reflections evenly. The result is a room that sounds accurate without feeling sterile.
Address the Ceiling Cloud
A ceiling panel directly above the mix position eliminates the strongest early reflection in most rectangular rooms. Install a suspended panel (minimum 2 ft × 4 ft) at ceiling height using thick bass trap material—not thin foam.
Ceiling clouds should be at least as wide as your speakers due to the omnidirectional dispersion of low frequencies. Stereo imaging accuracy and listener fatigue both improve noticeably with this one addition.
Cover Floor Treatment and Furniture
Hard floors cause significant reflection issues, especially in smaller rooms. A large area rug centred between listening position and monitors reduces flutter echo and improves imaging. Typical carpet absorption coefficients show 0.01 at 125 Hz but 0.45 at 4 kHz—effective for mid-to-high frequencies only.
Bookshelves filled with irregular objects provide passive diffusion at the rear wall, though their absorption and diffusion characteristics are highly uneven and don't replace purpose-built diffusers.
Choosing the Right Materials: Rockwool, Fiberglass, and Alternatives
Rockwool vs. Fibreglass
Both materials absorb sound effectively, but performance differs significantly at lower frequencies:
Rockwool (Mineral Wool):
- Denser and easier to handle without protective gear
- Better low-frequency absorption: 0.26 at 125 Hz vs. 0.17 for fibreglass
- Not classified as hazardous under CLP Regulation
- Preferred for DIY studio builds
Fibreglass:
- Similar high-frequency absorption at lower material cost
- Requires NIOSH-approved N95 respirator during installation
- Fibres cause temporary skin and mucous membrane irritation
For equivalent thickness (2 inches), both achieve similar NRC ratings (1.00), but rockwool outperforms below 250 Hz where room modes are most problematic.

Foam Alternatives
Open-cell acoustic foam performs poorly below 500 Hz. Auralex 2" Studiofoam Wedges show just 0.11 absorption at 125 Hz compared to 0.26 for rockwool — making foam almost entirely ineffective for bass control. Foam handles high-frequency flutter echo well, but relying on it for full-room treatment leaves bass problems unaddressed and produces a muffled, tonally unbalanced result.
Vehicle Material Distinctions
The same principle applies in vehicles — each material targets a specific problem, and substituting one for another produces poor results. Three materials handle distinct roles in automotive builds:
Butyl rubber deadening mats: Constrain panel vibration and reduce structural noise amplitude. Apply directly to door skins and metal panels.
Closed-cell foam: Provides thermal insulation and minor acoustic damping in door cavities. Acts as a decoupling layer between MLV and metal surfaces.
Mass-loaded vinyl: Dense barrier material that blocks airborne noise transmission. Install on floors and firewalls with 100% sealed coverage.
Using the wrong material in the wrong location is one of the costliest mistakes in car audio builds — not just in wasted product, but in labour to redo it. Identify the noise mechanism first (vibration, airborne transmission, or thermal transfer), then select the material designed for it.
Common Acoustic Treatment Mistakes to Avoid
Treating Symptoms Instead of Sources
Adding foam panels when the problem is low-frequency buildup creates a muffled, unbalanced sound without solving actual bass mode problems. Over-treating high frequencies compounds this — spaces become uncomfortable to work in whilst the real issues go untouched.
Research which frequency range causes the problem before purchasing materials. Low-frequency issues require thick, dense porous absorbers in corners—not thin foam on walls.
Skipping Measurement
Attempting acoustic treatment without using free room analysis tools like REW (Room EQ Wizard) or a basic SPL meter leaves the entire process to guesswork. Even one test measurement reveals:
- Which frequencies accumulate in your space
- Where room modes occur
- Whether treatment improves or worsens response
Measurement saves significant time and money by directing treatment to actual problems rather than perceived issues.
Prioritising Coverage Area Over Placement
Once you know where your problems are, placement matters far more than coverage area. Lining every surface without targeting high-impact zones is expensive and acoustically ineffective. Covering broader reflection zones at first-reflection points is more effective than single-point treatment, and strategic placement of quality materials always outperforms blanket application of cheap foam.
Focus on:
- Corner bass traps first (studios)
- Door skins and floor pan first (vehicles)
- First-reflection points second (studios)
- Ceiling clouds third (studios)
Each step in this order produces a noticeable difference — you'll hear the improvement before moving to the next stage.
Frequently Asked Questions
Is sound deadening for cars worth it?
Sound deadening is effective for reducing road noise, improving bass clarity, and eliminating panel resonance. The gains are strongest when paired with speaker upgrades — deadening lets speakers perform closer to their rated output rather than fighting cabin vibration.
What is acoustic treatment used for?
Acoustic treatment controls how sound behaves inside a space — reducing unwanted reflections, echo, and resonance. It improves listening accuracy and recording clarity by addressing the room's acoustic properties rather than the sound source itself.
Which is better for sound absorption: rockwool or fibreglass?
Rockwool outperforms fibreglass at mid-to-low frequencies for the same thickness, is safer and easier to handle, and is recommended for most DIY studio applications. Fibreglass is a viable alternative at lower cost if proper protective equipment (N95 respirator, gloves, long sleeves) is used during installation.
What is the difference between soundproofing and acoustic treatment?
Soundproofing blocks sound from passing through walls, floors, and ceilings using mass and decoupling. Acoustic treatment controls reflections and resonance inside the room using absorption and diffusion. Most home studio problems are acoustic treatment issues — treating the room you have is more practical than isolating it.
Where should I start with acoustic treatment in a home studio?
Start with bass trap panels in all four floor-to-ceiling corners using dense mineral wool (minimum 4 inches thick), followed by a ceiling cloud above the mix position. These two steps resolve most low-frequency buildup and early reflection problems in small rectangular rooms.
How thick should sound deadening material be for a car?
Butyl rubber mats at 1.5–2mm work well for door panels; floors and firewalls benefit from 2–4mm or an added mass-loaded vinyl layer. Full surface coverage at moderate thickness consistently outperforms partial coverage at maximum thickness.