Introduction
Put up acoustic panels before measuring your room, and you might fix nothing—or make things worse. Every room has a unique acoustic fingerprint shaped by its dimensions, surface materials, and furnishings. Untreated spaces produce uneven frequency responses, flutter echoes, and bass buildup that distort what you hear or record. Without measurement first, you risk over-absorbing high frequencies while leaving low-end problems untouched, producing a dull, unbalanced result.
Measurement tells you what the room is actually doing. This guide covers the key acoustic parameters to capture, three practical methods for doing so, and how to translate those results into effective treatment decisions.
Key Takeaways
- Acoustic treatment only works when based on actual measurements, not guesswork
- Three measurements drive every treatment decision: reverberation time (RT60), room mode frequencies, and early reflection behavior
- Options range from free smartphone apps and room mode calculators to dedicated software like Room EQ Wizard
- Target RT60 varies by room use—recording studios need 0.3–0.4 seconds, offices 0.4–0.6 seconds
- Single-position measurements and ignored low frequencies are the two most common causes of under-treated rooms
Why Measuring Before Treating Makes All the Difference
Every room has a unique acoustic fingerprint shaped by its dimensions, surface materials, and furnishings. Without measurement, treatment is applied blind. You may over-absorb high frequencies while leaving bass buildup untouched, creating a dull, unbalanced sound. Measurements reveal the specific problems your room faces, ensuring every panel and bass trap addresses a real issue rather than a guess.
Three Acoustic Phenomena Measurement Targets
Reverberation describes how long sound lingers after the source stops. Too much makes speech unintelligible and music muddy; too little creates a dead, lifeless space.
Room modes (standing waves) form when a room dimension aligns with a sound wavelength. The reflected wave reinforces or cancels itself, producing loud hot spots and dead zones at specific frequencies — a particularly severe problem in small rooms where these modes are widely spaced and clearly audible.
Early reflections are direct sound bouncing off nearby surfaces before reaching the listener or microphone. They mask fine detail and reduce clarity in critical listening environments.
Why Room Modes Dominate Small Rooms
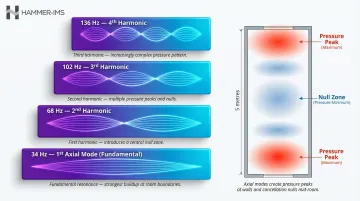
When a room dimension matches half a wavelength (or a multiple thereof), the reflected wave reinforces or cancels the original, causing dramatic peaks and nulls at specific frequencies. The lowest room mode occurs at approximately the speed of sound divided by twice the longest room dimension.
For example, a room 5 metres long produces its first axial mode at roughly 34 Hz (343 m/s ÷ 10 m). From there, modes stack at multiples of that frequency:
- 34 Hz — first axial mode
- 68 Hz — second harmonic
- 102 Hz — third harmonic
- 136 Hz — fourth harmonic
This stacking creates a comb-filter effect across the bass range. Listeners at modal nulls hear almost no bass at those frequencies; those at pressure maxima experience overwhelming buildup.
Soundproofing vs. Acoustic Treatment: A Critical Distinction
Understanding modes also clarifies why treatment alone has limits — some problems require a different approach entirely.
Soundproofing (sound isolation) blocks sound from entering or leaving a room using mass, airtight seals, and decoupling techniques. Acoustic treatment controls how sound behaves inside the room through absorption and diffusion. Confusing the two leads many people to invest in the wrong solution:
- Neighbour's music bleeding in? That's a soundproofing problem.
- Room sounds boomy or harsh? That's an acoustic treatment problem.
What You Need to Measure Your Room's Acoustics
The tools you use directly affect measurement accuracy. Three tiers exist, each suited to different goals and budgets:
Tool Tiers
Free/Low-Cost (€50–€100):
- Room EQ Wizard (REW) software running on a laptop
- Free online room mode calculators
- Affordable USB calibrated measurement microphone
Mid-Range (€200–€500):
- Audio interface + dedicated measurement microphone
- Professional analysis software with advanced visualisation
Professional (€2,000+):
- Dedicated building acoustic analysers capable of 1/3-octave band analysis per ISO 3382
- Calibrated omnidirectional measurement loudspeaker
Once you've selected your tools, setup conditions matter just as much as the equipment itself.
Preconditions and Setup
Measure the room in its "normal use" state — furniture in place, doors and windows as they normally would be. This captures the acoustic reality you'll experience.
For source and microphone positioning:
Do not place both the sound source and microphone in corners or at the exact room centre
Place the sound source in a corner (where all room modes have pressure maxima)
Take multiple microphone readings at different positions, then average the results
Position microphones at least 1 metre from any reflecting surface, including the floor
Space microphone positions at least 2 metres apart to capture spatial variation
Background noise is also a critical variable. The signal-to-noise ratio must be sufficient for valid reverberation decay readings — ISO 3382-2:2008 specifies a minimum SNR of 35 dB above background noise for T20 measurements and 45 dB for T30 measurements. Measure during quiet periods with HVAC off and windows closed.
Three Methods to Measure Room Acoustics
These three methods are arranged from quickest and simplest to most rigorous. Which one you need depends on your goals, your available tools, and whether you're planning a serious acoustic treatment or just diagnosing an obvious problem.
Method 1: The Clap Test and Impulse Listening
A quick, zero-cost check using handclaps or a balloon pop to identify flutter echo, excessive reverberation, and obvious frequency colouration. Your ears and a recording device are all you need.
What you need:
- Hands or a balloon
- Smartphone voice recorder or DAW for playback review
- Optionally, a free spectrum analysis app
Steps:
Stand in the centre of the room and deliver a sharp handclap or pop a balloon. Listen immediately for any "boing," flutter, or ringing. Repeat from multiple positions including corners and your primary listening/recording position.
Record several claps using a smartphone or microphone connected to a DAW. Play back through headphones (bypassing the room) to hear reverb tail length and any obvious resonant frequencies.
Walk the room while playing a steady tone from a loudspeaker at low-mid frequencies (80–200 Hz). Note positions where the volume dramatically increases or disappears—these indicate room mode nodes and antinodes.
When to use it: Fast, free, and requires no technical knowledge. It cannot produce numeric RT60 or frequency-specific data, so treat it as a first pass or a sanity check for informal spaces rather than a planning tool.
Method 2: Room Mode Calculation Using Dimensions
A calculation-based approach that uses your room's dimensions to predict where standing wave resonances will occur—before you spend anything on treatment or equipment.
What you need:
- Tape measure
- Online room mode calculator (such as amroc.io)
- Spreadsheet or graph paper to log results
Steps:
Measure the room's three dimensions (length, width, height) in metres or feet as accurately as possible.
Input dimensions into a room mode calculator. Review the output showing axial, tangential, and oblique modes and their frequencies.
Identify any frequency clusters (modes piling up at similar frequencies) and note which dimensions are producing the most problematic resonances. Flag frequencies below 300 Hz as priority treatment targets.
When to use it: Free and fast, with actionable frequency data before you buy a single panel. The catch: calculations only predict. They don't account for furnishings, surface absorption, or construction details that shift real-world resonance behaviour. Use this as a planning tool, then validate with Method 3.
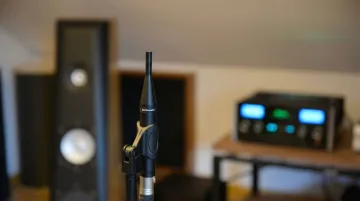
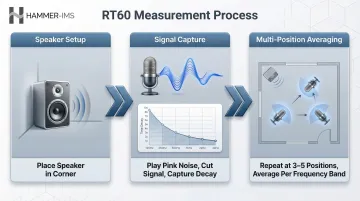
Method 3: RT60 Reverberation Time Measurement
The standard quantitative method for measuring how long sound takes to decay by 60 dB after a source stops. RT60 is the primary metric in acoustic design standards (ISO 3382) and directly tells you how much absorption treatment your room needs.
What you need:
- Loudspeaker (non-directional, placed in a corner)
- Calibrated measurement microphone
- Laptop running Room EQ Wizard (REW) or equivalent software
- Alternatively, a dedicated building acoustics analyser
Steps:
Set up the loudspeaker in one corner of the room. Position the measurement microphone at your primary listening or recording position, at least 1–2 metres from any wall. Connect the microphone to your analysis software.
Play a pink noise or swept-sine signal through the loudspeaker (both are preferred excitation sources per ISO guidance), then abruptly cut the signal. Capture the sound decay curve. The software calculates RT60 (or T30/T20 extrapolated to 60 dB) for each 1/3-octave frequency band from 125 Hz to 4 kHz.
Repeat measurements at three to five different microphone positions around the room. Average the results per frequency band to account for spatial variation from room modes, and log everything in a table organised by frequency.
When to use it: This is the method for serious treatment planning. It produces standards-compliant data you can compare directly against established RT60 targets for your room type. REW is free, which keeps entry costs reasonable — though your results are only as reliable as your microphone calibration and the signal-to-noise conditions during the session.
How to Interpret Your Results and Plan Acoustic Treatment
Misreading RT60 data or ignoring frequency-band variation causes predictable problems: over-absorbed highs leave the room sounding dead and muffled, under-treated bass buildup makes it boomy, and misplaced panels simply miss the actual reflection points. Always interpret results by frequency band, not as a single average figure.
Normal/Acceptable
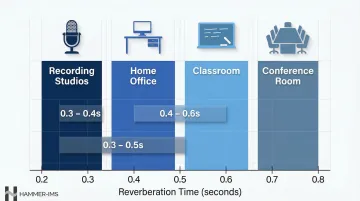
Target RT60 ranges vary by room type:
- Recording studios: 0.3–0.4 seconds
- Home offices: 0.4–0.6 seconds
- Classrooms: 0.4–0.6 seconds
- Conference rooms: 0.3–0.5 seconds
A room where measured RT60 is within the target range across 125 Hz–4 kHz with relatively flat frequency response across bands requires minimal treatment.
Actionable next step: Identify any frequency bands that fall outside range even if the average is acceptable.
Minor Issues
Slight excess in high-frequency RT60 (above ~1 kHz) indicates insufficient broadband absorption. Thin foam or light soft furnishings can help.
Modest bass buildup (100–300 Hz band higher than target by less than 3 dB in RT60) may be addressed with thicker absorbers or by repositioning panels with an air gap behind them to extend their effective absorption range downward.
Actionable next step: Calculate approximate additional absorption needed using Sabine's formula:
T = 0.16V / A
Where:
- T = reverberation time in seconds
- V = room volume in cubic metres
- A = total absorption in square metres (surface area × absorption coefficient)
Rearrange to solve for the additional absorption area required to reach your target RT60.
Out-of-Spec
Long RT60 across all frequency bands (reverberant room) requires substantial surface coverage. Research suggests that treating 15–25% of total surface area is a starting threshold, rising to 30%+ for critical listening environments.
Severe bass mode peaks (specific frequencies appearing much louder than others in the room mode calculation) require bass traps placed in corners where modal pressure is highest.
Acoustic performance of treatment panels depends heavily on material thickness and density consistency. Panel specifications must remain uniform across production batches, since even small deviations in thickness shift the absorption coefficient and undermine your treatment plan. Manufacturers of foam, mineral wool, and nonwoven acoustic materials use contactless thickness gauges — such as Hammer-IMS's M-Ray systems — to verify that consistency at the production level.
Actionable summary: Create a treatment priority list based on measurements:
- Address worst-offending frequency bands first
- Prioritise corners for bass trapping
- Use the mirror trick to identify early reflection points for mid/high absorbers
- Confirm with follow-up measurements after each treatment phase
Common Errors That Skew Acoustic Measurements
Measuring from a Single Position
Room modes create large spatial variations in sound pressure. A single microphone position captures a highly unrepresentative picture—typically over-representing resonances at that specific location.
ISO 3382-2:2008 requires multiple source-microphone combinations spaced at least half a wavelength apart to account for spatial differences in reverberation. Engineering-grade assessments demand at least six independent measurements.
Solution: Measure from a minimum of three to five positions and average the results.
Incorrect Signal-to-Noise Conditions
Measuring in a room with active HVAC, street noise, or other background sources adds noise floor that truncates the audible decay curve. This produces artificially short RT60 readings and missing low-frequency data.
Without adequate signal-to-noise ratio, the estimated decay time may be too short.
Solution: Measure during quiet periods and verify SNR meets ISO minimums (35 dB for T20, 45 dB for T30) before finalizing any result.
Treating Calculation Outputs as Final Truth
Room mode calculators predict resonances based on geometry alone. Furniture, irregular surfaces, and mixed wall materials all shift real-world modal behavior — sometimes significantly. Treat calculator outputs as a starting hypothesis, then confirm or revise against actual RT60 measurements.
Frequently Asked Questions
How do you calculate acoustic treatment in buildings?
Treatment quantity is estimated using Sabine's formula (T = 0.16V/A), where you calculate the additional absorption area needed to reach a target RT60. In practice, this means covering roughly 15–25% of wall/ceiling surface area as a starting point, then adjusting based on measured results.
What is the ISO standard for sound measurement in buildings?
ISO 3382 is the primary standard for measuring reverberation time in rooms and auditoria, while ISO 16283 governs field measurement of sound insulation in buildings and building elements. Both standards specify source/receiver positions, signal types, and minimum frequency bands to ensure reproducible results.
What does an NRC of 0.95 mean?
An NRC of 0.95 means the material absorbs 95% of sound energy across the 250–2,000 Hz range — making it a near-perfect absorber for mid and high frequencies. NRC is a single-number average of absorption coefficients at 250, 500, 1,000, and 2,000 Hz.
What are the requirements for good acoustics in buildings?
Good acoustics depend on four core factors:
- Appropriate RT60 for the room's intended use
- Even sound distribution without dead spots or flutter echoes
- Adequate speech intelligibility (measured by STI score)
- Sufficient sound insulation from adjacent spaces
These targets differ significantly between classrooms, recording studios, and open offices.
What is the difference between soundproofing and acoustic treatment?
Soundproofing (sound isolation) blocks sound from travelling into or out of a room and relies primarily on mass and airtight seals. Acoustic treatment controls how sound behaves inside the room using absorbers and diffusers. Most rooms benefit from both — applied independently, since no single product solves both at once.
How do I measure reverberation time at home without professional equipment?
Room EQ Wizard (REW), a free software tool, combined with an affordable USB measurement microphone and a loudspeaker can produce valid RT60 measurements at home. Place the speaker in a corner, capture pink noise decay at multiple microphone positions, and average the results per frequency band.